How do I create a photo album?
Albums are the easiest way to organize and share a bunch of photos and videos in your Dropbox. Once you create an album, you can share it with friends, family, and colleagues—even if they don't have a Dropbox account.
Quick links:
How do I create an album on the photos page?
How do I create an album from a folder of pictures?
What do I do if changes I've made to shareable albums fail to sync on the Dropbox website?
Create an album on your Photos page
- Sign in to the Dropbox website and click on Photos in the sidebar on the left.
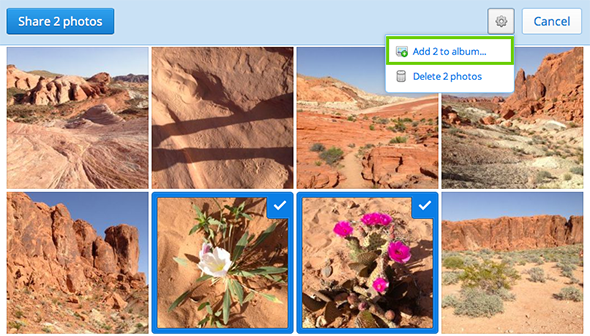
- Click on the photos you want to be part of the album. A blue border and checkmark will appear on each selection.
- In the blue bar across the top of the page, click the gear icon and select the Add to album...
- Click Create new album in the pop-up window and enter the album name.

Create an album from the Photos page
Create an album from a folder of pictures
If you've already organized your photos into folders, you can create an album directly from those folders.
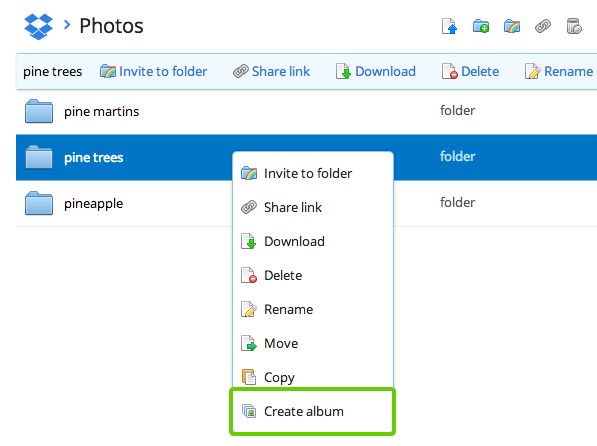
- Sign in to the Dropbox website and find the folder you want.
- Right-click (or on a Mac, Control-click) on the folder and select Create album.

Create an album from a folder
Your new album will appear instantly on your Photos page and have the same name as the folder. The album will have all of the photos that appear in the top level of the folder; photos in subfolders of the folder will not be included automatically.
What if changes I've made to albums fail to sync?
Photos that are added to shareable albums via the Dropbox website (i.e. https://www.dropbox.com/photos) won't sync with your computer like regular folders. While the photos in an album should already be located on your computer (in the local "Dropbox" folder), they may not be organized into the album as it appears in the website.
If you'd like to download a separate copy of only the photos in the album, follow these steps:
- Visit the photos page and open the album you'd like to download
- Click the "Share album" button, click "Get link," and then click "Go to link"
- Click the ellipsis icon (...) in the upper right-hand corner and select "Download." This will download a zip archive of all photos in the album
You can always add more photos to an album by selecting them on the Photos page and clicking the Add to album... button in the blue bar at the top of the page. Or just as easy, select photos and drag them to the album name in the list on the left.
Creating albums does not take up additional space in your account, nor does it change the locations of your photo and video files.


